Quick user guide¶
This section gives a quick introduction to the Rundata-net interface.
Rundata-net is essentially an interface to a database. Since the database doesn’t change very often, I have adopted a rather radical approach to accessing it. Most of the site functions are executed inside the user’s browser, which includes the database. When the user opens the main page, it will take some time to load the site. This is the point where the database is transferred to the user’s computer. Once it is transferred, all functions should work smoothly. Moreover, once the site is loaded you may work without the internet connection. Map display won’t work without the internet connection.
The main page is divided into several areas, which I refer to as panels. These are shown with numbers in the image below.
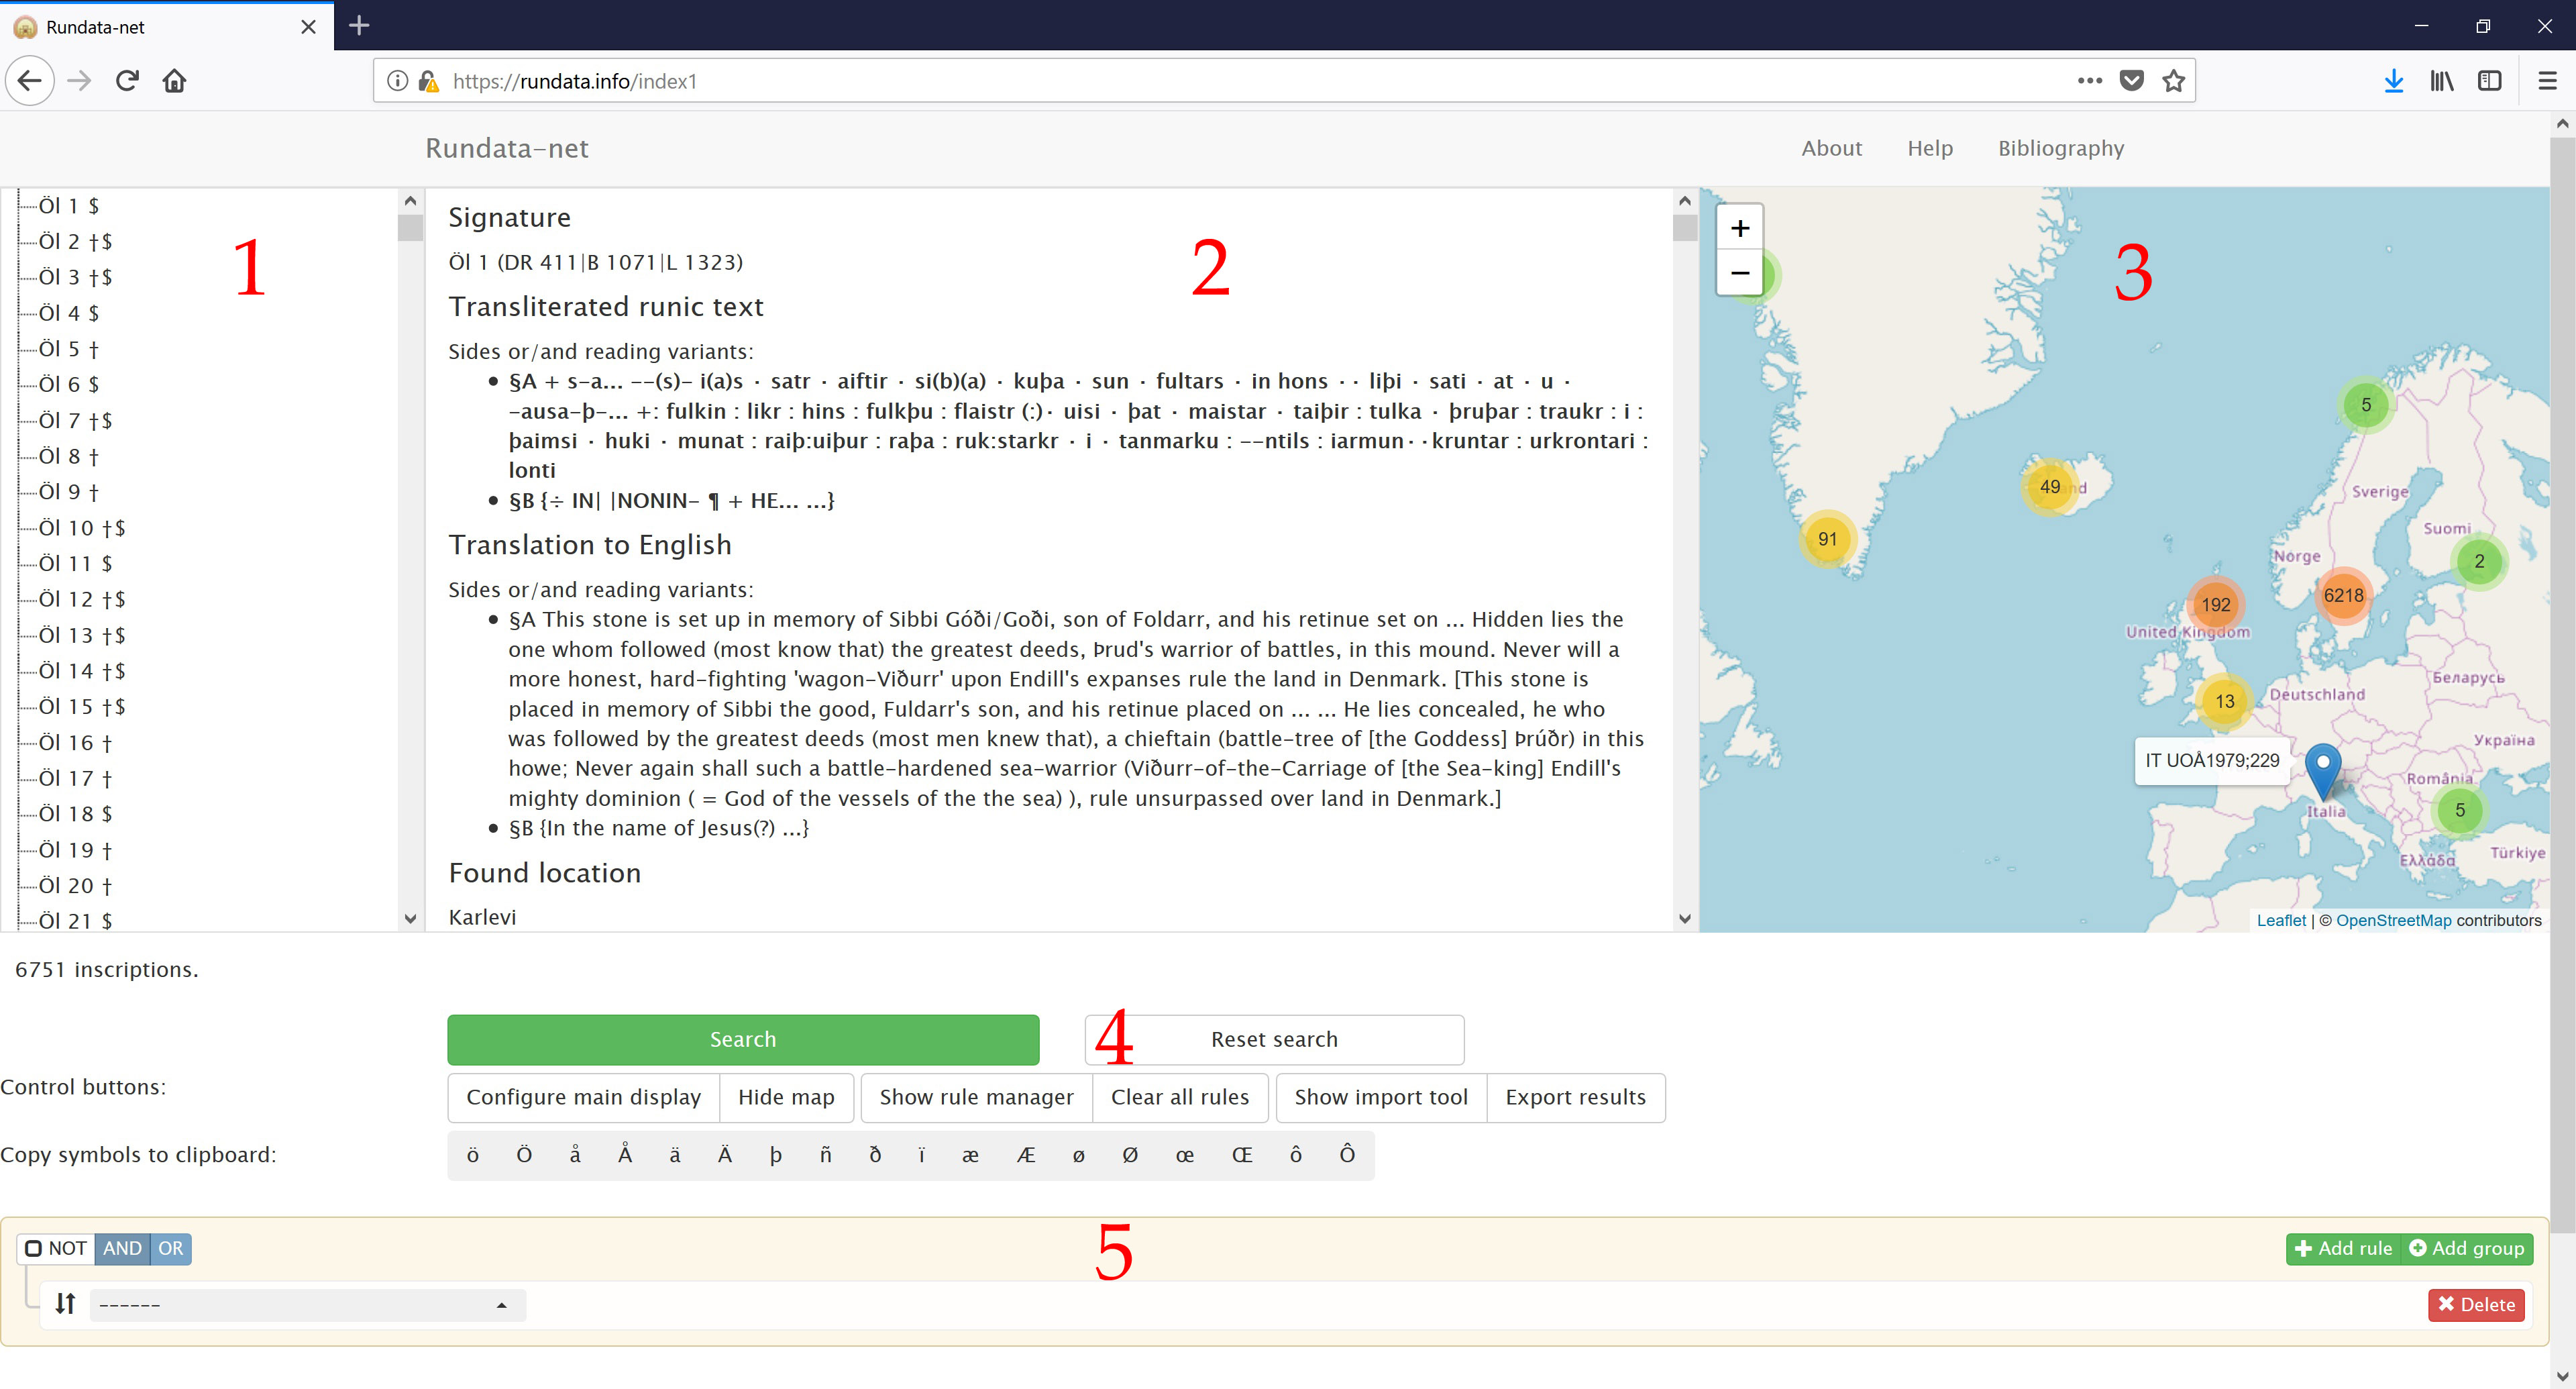
List of inscriptions retrieved and their total number.
Main display on which information about particular inscription is given.
Map display. Shows inscription found location.
Panels of control elements and buttons.
Query builder, which is used to define search queries.
List of inscriptions¶
In this list each node corresponds to an individual inscription.
The inscriptions are referenced by a unique name/ID called a signature, see
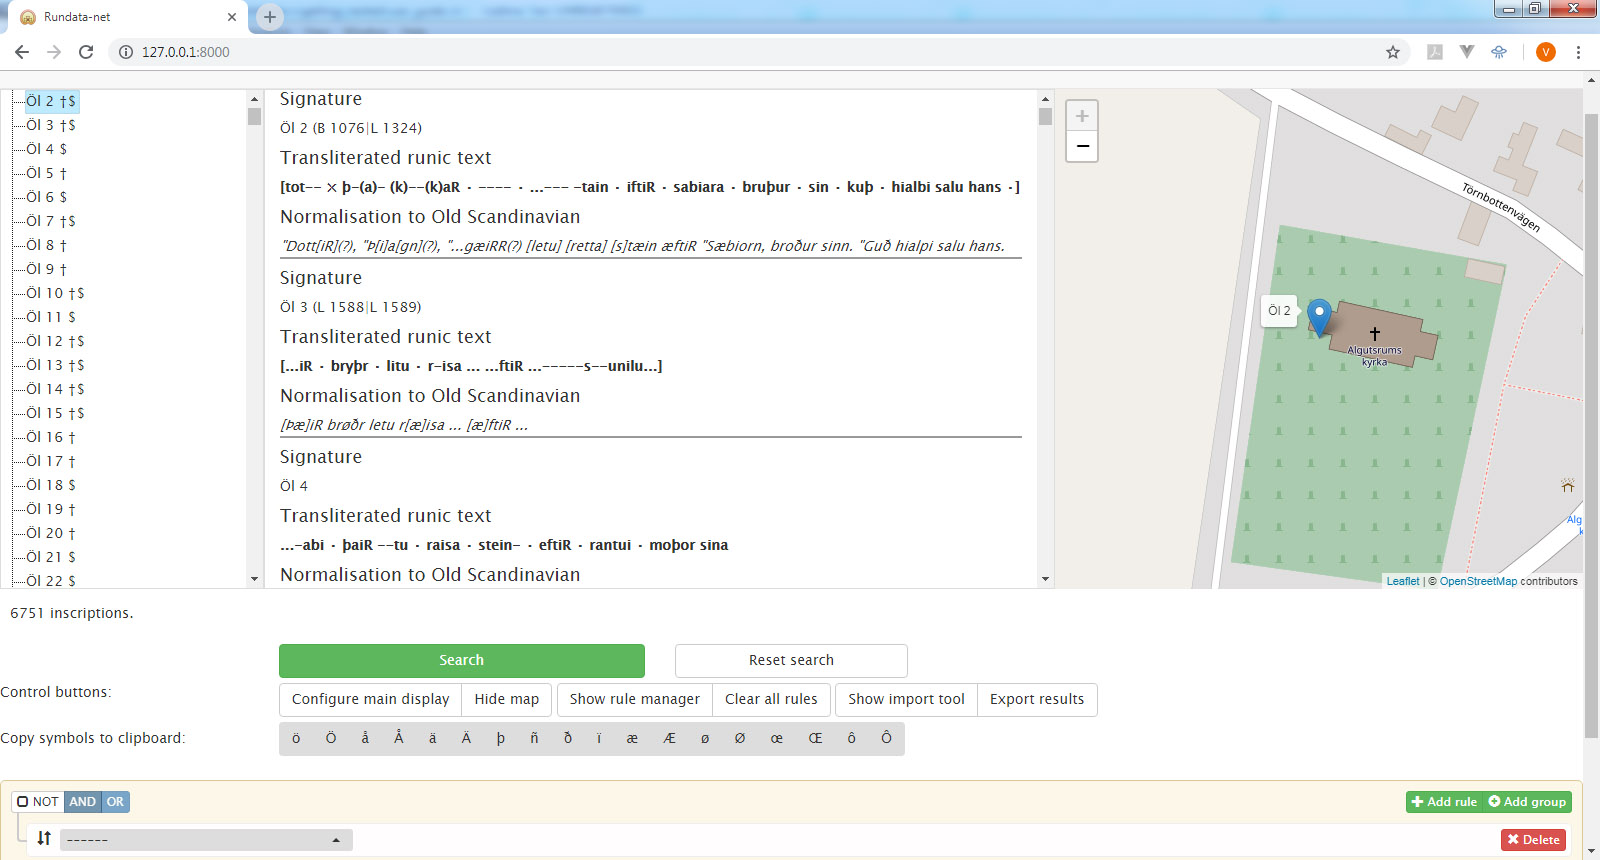
Inscription identifier (signature). The name/ID of some inscriptions have changed over time.
One example is the inscription Öl 2, which has
been known as B 1076 and L 1324. The list of inscriptions
contains only the most recent names, i.e. neither B 1076, nor
L 1324. Such former names (if any) are given on the
main display.
When a user selects an inscription from the list, information about it is displayed on the main display panel. It is only possible to select a single inscription at a time.
Below the list of inscriptions a status text indicates the number of inscriptions available for selection. This can be useful when performing a search. The status text will then give the number of results.
Main display¶
Here, information on inscriptions is given. Use the Configure inscription display button for adjusting the kind of information to be displayed.
The main display can be edited for the user’s need. Thus clicking on the display enables you to type in or delete text. This is done in order to support keyboard navigation and shortcuts like select, copy, paste.
Important
It may appear that main display contains all the data, but in fact it may contain just a fraction of data. If Rundata-net needs to display information about many inscriptions (for example, 6751 for the case when no search had been performed), then it is not practical to display information about all 6751. Such display will take very long time to produce and will make your browser extremely slow. Whenever there is a need to display large amount of inscriptions, Rundata-net will pretend that they are on the screen, but will actually load them into the screen according to user’s scroll position. This is important to keep in mind if you would like to copy text from the main display to another application by selecting all text in the main display. If you need to export all search results, you may use export functionality.
Map display¶
The map shows placemarks for the inscriptions if coordinates are available. It shows the location where the inscription was found and not its current location. Some such coordinates are known to be wrong. However, since Rundata-net is in this regard simply a different view program for SMDB, it will inevitably inherit such flaws in the SMDB.
When a placemark is clicked on, the main display is scrolled in order to display the inscription referenced by that particular placemark.
Control panels¶
There are several horizontally aligned panels of control elements and buttons.
Main display configuration¶
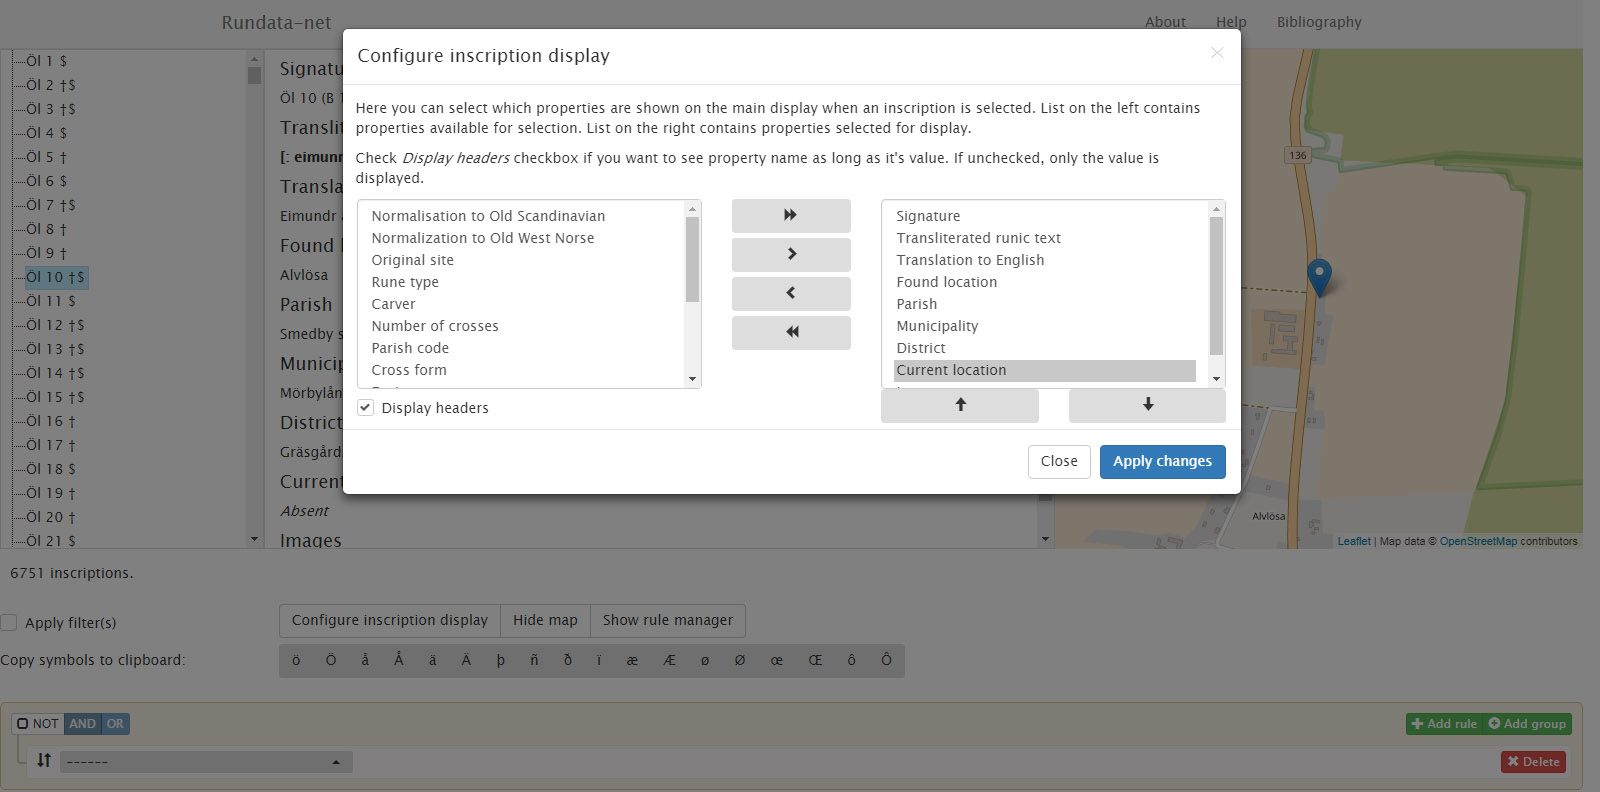
The Configure main display button opens a dialog box used to configure the main display. On this dialog box, the user may select the information to be shown on the main display for each individual inscription.
The list to the left contains fields available for selection. The list to the right contains fields selected for display. The order of the selected fields may be rearranged by using the two buttons located under the right-hand list.
Changes in the selected fields are applied when the dialogue window is closed by clicking on Apply changes button.
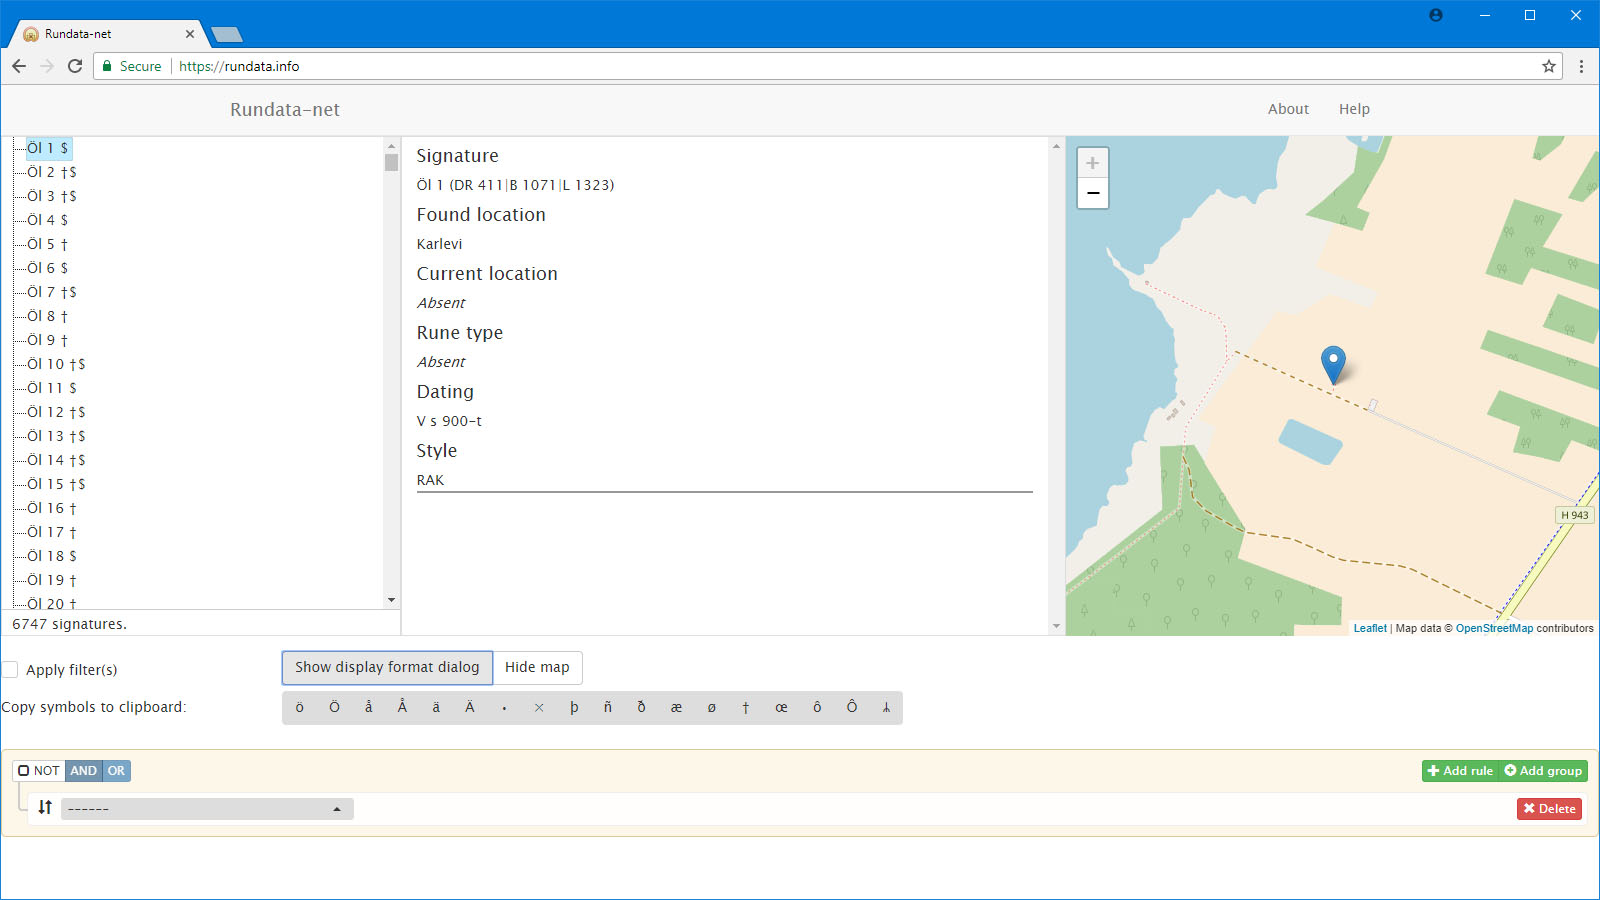
The Display headers checkbox is used to control whether any field headers should be presented on the main display or not. Compare these two images. The version to the left has the headers turned on. The version to the right has the headers turned off.

Map visibility control¶
The Hide map/Show map button is self-explanatory.
Rule manager¶
Click on Show rule manager makes visible rule manager. Rule manager is a tool that can be used to export and import search query. Exported query can be e-mailed to a colleague or applied next time user works with Rundata.
Clearing search query¶
Search query consists of individual rules and group of rules. Each rule/group provides a Delete button, which allows to delete that particular rule or group. However, if you have a lot of rules, which you would like to delete, clicking on every individual Delete button might be tiresome. Button Clear all rules may be used in such cases. After clicking on it, all searching rules will be removed and search query will consist of a single placeholder rule.
Importing and exporting results¶
It is possible to export search results and to import list of inscriptions.
Export results button allows to export all search results in a file.
File is created in a
Office Open XML
(xlsx) format. This format can be opened in Excel. Rundata-net exports data in a file
with default name rundata-net_results.xlsx.
User may select the location where the file will be saved to and the name of the
file. Exported file contains all inscriptions from the list of inscriptions and the search parameters.
Number of columns will correspond to the number of selected inscription properties,
i.e. number of columns corresponds to the right-hand list of the main display
configuration dialog box. First line of the file is a header and it will contain
column names. Some values may contain a list of values. This is true for example for
column Images. An inscription may have multiple images assigned to it.
In such a case, values are separated by a semicolon. For example value
DR 411;B 1071;L 1323 consist of three values DR 411, B 1071,
and L 1323. All coordinates are given in WGS 84 geodetic system.
The Rundata-net website allows users to import lists of inscriptions for further study and analysis. This feature is particularly useful for researchers who wish to examine inscriptions detailed in academic publications or other sources. By importing these lists, users can easily access and explore the inscriptions within the Rundata-net, facilitating deeper analysis and research.
Warning
Rundata-net assumes that imported files are in Unicode encoding. It seems that Excel will not use Unicode by default if user simply selects Save file. This is the first thing to check if you experience problems importing files.
Show import tool button shows a panel from which a user can select a file or drop a file to that area. Rundata-net supports 3 file formats for import.
Important
A general rule. If a signature contains a comma as it’s part, then such
signature must be enclosed by quotes, i.e. you must write "G IK365,8"
instead of G IK365,8. This is true for all the formats described below.
Format #1. A simple format where all inscriptions are listed on one line, separated by commas. Example of such a file:
Öl Köping13,Ög ATA322-4035-2011:14,Sö 175,U 381,"G IK365,8",Öl 1,Öl 11
An example is available for download as csv-one-line.csv.
Format #2. A multiline format where each inscription is written on its own line:
Öl Köping13
Ög ATA322-4035-2011:14
Sö 175
U 381
"G IK365,8"
U 358
An example is available for download as csv-multiline.txt.
Format #3. A CSV file that may or may not include a header. If the file has no header,
the first column is assumed to contain signatures. If a header is present,
the column named signature (case insensitive) is used. Example of such
a file with a header:
Dating,Signature
1,Öl Köping13
2,Ög ATA322-4035-2011:14
3,Sö 175
4, U 381
5,"G IK365,8"
An example is available for download as csv-header.csv. Note that
there may be spaces around non-enclosed signatures, like on line 4 in the example
above.
Note
Regardless of the format, signatures are always provided without any special symbols like † or $. Although $ may be added to a search parameter, it is interpreted as part of a regular expression (see Searching for inscriptions for information on regular expressions).
Tip
When importing from a file, Rundata-net processes a list of signatures
and creates a single search rule for all of them. If you only have
a few signatures to import, you can enter them directly. There’s no need to
put them into a file. Instead, add a search rule Signature with
operator matches expression, and enter your signatures in the format
signature 1$|signature 2$|signature 3$, i.e. a list of signatures
suffixed by $ symbol and separated by |.
Why is three a $ symbol after each signature? Consider a regular expression
search with the value Öl 1. Such a search yields 11 inscriptions and can
be interpreted as find all inscriptions where the signature contains Öl 1.
However, if we add a $ symbol to the end of the signature, i.e. Öl 1$,
the search rule is interpreted as find all inscriptions where the signature ends
with Öl 1. Only a single inscription matches this criteria. More details
about regular expressions searches are provided in the Searching section.
Special symbols¶
This horizontal panel contains a list of buttons with special symbols. It contains symbols that might not be readily available on the user’s keyboard layout. Clicking on a symbol’s button produces a copy of that symbol in the clipboard. This panel can be useful when entering text in filters.
Query builder¶
In this area the user builds queries/searches/filters for the database. A query consists of rules, which can be grouped. Groups and rules are connected by gray lines to the left, which help the user to trace relations. Each group has a set of logical operators presented in its upper left corner: NOT, AND, OR. Operators describe how rules inside the group are to be combined (AND, OR) and if the group condition should be inversed (NOT). The table below shows how logical operators work. For the sake of simplicity, it is demonstrated with only two variables a and b. Each variable can have a value of TRUE or FALSE, denoted as T and F respectively.
a |
b |
a AND b |
a OR b |
NOT a |
NOT b |
|---|---|---|---|---|---|
T |
T |
T |
T |
F |
F |
T |
F |
F |
T |
F |
T |
F |
T |
F |
T |
T |
F |
F |
F |
F |
F |
T |
T |
More details and examples may be found in Wikipedia.
Each rule consists of a rule name followed by an operator and a rule value. You can find various search examples in Searching for inscriptions. The user can create, delete and rearrange rules/groups with drag and drop.
The guiding idea behind the query builder has been to make it user-friendly. Searches in
the original Rundata are performed by way of regular expressions. This is
a powerful tool, when mastered. It allows one to search by way of
beauties such as {b/t}{a/o}. You may need more clicks and a bit more typing
with a query builder, but the representation of rules in it is no doubt
more user-friendly.